


I promised this post a while back, but it's taken me some time to get it in order. For the Ecclesia Gnostica Catholica convention in August I built a portable Gnostic Mass altar and enclosure to be used at the hotel. My post on the enclosure can be found here.
In my opinion the biggest difficulty with building a portable altar suitable for the Gnostic Mass is making each piece light enough for a single person to move. I'll admit I'm a little biased on this point - years ago when Leaping Laughter built its first portable altar, we were doing the Gnostic Mass at a Masonic temple in Saint Paul. It was a beautiful space, built in 1915 - so pretty much the exact sort of temple Aleister Crowley was probably thinking of when he wrote the Mass. However, the problem with it was that we had to store all of our equipment in the attic and bring it downstairs before we could do the ritual. Then, when we were done, we had to reverse our steps and put it all away.
And let me tell you, when you're one of only a couple of people actually willing to haul stuff, it's hard moving big, heavy pieces around that require multiple people to safely move. The old altar was strong and broke down into pieces, but most of those pieces could only easily be moved by two people. I intended to avoid this problem when I designed the altar for the convention. With wood the issue is almost always that the stronger it is, the heavier it is. So this posed a bit of a challenge. Here's how I overcame it.
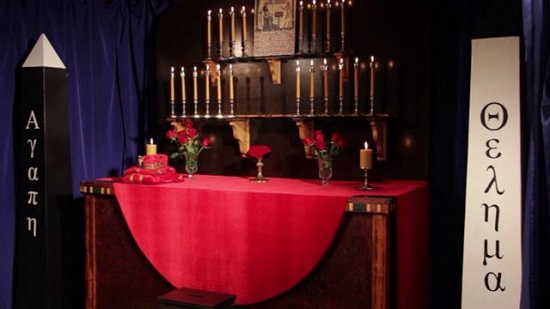
For the top, you can use half-inch plywood. The plywood itself doesn't need to hold a lot of weight. Stick to 1/2 inch - thicker plywood makes the whole thing much heavier. The top should separate into two pieces, so you need two pieces that are either 3 x 3 feet or 3 1/2 by 3 feet. The latter will make the altar full regulation size (7 x 3) while the former will give you a slightly shorter 6 x 3 altar - which is what I did for the convention. Some of the Masses were going to be done in an upstairs conference room rather than the main ballroom, so the slightly shorter width worked better.
To each of the two top pieces you attach a 3 foot square made from 1 x 6 boards. The boards are aligned vertically so that they can take the weight of the Priestess on the altar. The squares are held together with 1 5/8 inch screws at each corner, the plywood is screwed into the top with 1 inch screws, and on the bottom of each corner you should use a metal L-brace for greater strength. We rushed the construction and skipped the L-braces, but that meant we had to brace the altar in the middle when a couple of the screws stripped on one side. The L-braces prevent this from happening by making the bottom of the squares substantially stronger without adding much additional weight.
What you will find about this arrangement is that each of the pieces forming the top are light enough to be moved by one person and small enough to fit into many regular vehicles. This was an important design requirement. Note that if you go with the 3 1/2 foot version of this you will have six inches of extra plywood hanging off each end, which is fine. With a cloth over it, it will look like a large rectangular space and a little less force is exerted on the center when the legs are closer together than the full 7 feet. To connect the top together, drill eight holes - two rows of four - on the sides that you want them to connect. Don't skimp try to use fewer bolts - one of the tricks of this design is that the bolts and brackets allow lighter pieces of wood to take the weight.
For the legs, use four 4 x 4 posts. On a regulation altar you will want the posts to be 43 1/2 inches for a total altar height of 44 inches. The altar that I built for the conference used 42 inch legs to shorten it a bit along with the reduced length, but the full 43 1/2 should work the same. Don't skimp and try to use 2 x 4 lumber for the legs - each of the 4 x 4 posts will be heavy, but they are strong enough that as long as they are secured properly you don't need wooden cross-braces on the sides or back. This is also vitally important to reduce the weight of each piece. You have four somewhat heavy legs, but each can be carried on its own.
The legs go inside the four outer corners of the assembled top, within the 1 x 6 squares, like legs on a table. Use four bolts to secure each leg, two from each of 1 x 6 boards that make the corner. Again, don't skimp on this - the number of bolts is important to keep the legs from wobbling. When fully tightened, the altar should stand on the four individual legs and be easily stable enough to use for the ritual. We were able to stand up on the conference altar and jump without any issues.
Other requirements - use washers with the bolts on both sides, and use those flanged nuts that can be unscrewed by hand. That way the whole thing can be taken apart and assembled without much in the way of special tools. Sometimes you wind up needing a pliars if one or more of the nuts tightens during the ritual - which happens sometimes. The washers minimize this sort of slippage, but they don't eliminate it entirely.
And basically, that's it. One of the nice things about going to a store like a Home Depot is that they can cut the wood for you - with this design it doesn't need to be super-precise for exactly this reason. You can get the following supplies and you should be good to go:
If you have questions, feel free to leave them in the comments. I'll do my best to answer them.
In my opinion the biggest difficulty with building a portable altar suitable for the Gnostic Mass is making each piece light enough for a single person to move. I'll admit I'm a little biased on this point - years ago when Leaping Laughter built its first portable altar, we were doing the Gnostic Mass at a Masonic temple in Saint Paul. It was a beautiful space, built in 1915 - so pretty much the exact sort of temple Aleister Crowley was probably thinking of when he wrote the Mass. However, the problem with it was that we had to store all of our equipment in the attic and bring it downstairs before we could do the ritual. Then, when we were done, we had to reverse our steps and put it all away.
And let me tell you, when you're one of only a couple of people actually willing to haul stuff, it's hard moving big, heavy pieces around that require multiple people to safely move. The old altar was strong and broke down into pieces, but most of those pieces could only easily be moved by two people. I intended to avoid this problem when I designed the altar for the convention. With wood the issue is almost always that the stronger it is, the heavier it is. So this posed a bit of a challenge. Here's how I overcame it.
For the top, you can use half-inch plywood. The plywood itself doesn't need to hold a lot of weight. Stick to 1/2 inch - thicker plywood makes the whole thing much heavier. The top should separate into two pieces, so you need two pieces that are either 3 x 3 feet or 3 1/2 by 3 feet. The latter will make the altar full regulation size (7 x 3) while the former will give you a slightly shorter 6 x 3 altar - which is what I did for the convention. Some of the Masses were going to be done in an upstairs conference room rather than the main ballroom, so the slightly shorter width worked better.
To each of the two top pieces you attach a 3 foot square made from 1 x 6 boards. The boards are aligned vertically so that they can take the weight of the Priestess on the altar. The squares are held together with 1 5/8 inch screws at each corner, the plywood is screwed into the top with 1 inch screws, and on the bottom of each corner you should use a metal L-brace for greater strength. We rushed the construction and skipped the L-braces, but that meant we had to brace the altar in the middle when a couple of the screws stripped on one side. The L-braces prevent this from happening by making the bottom of the squares substantially stronger without adding much additional weight.
What you will find about this arrangement is that each of the pieces forming the top are light enough to be moved by one person and small enough to fit into many regular vehicles. This was an important design requirement. Note that if you go with the 3 1/2 foot version of this you will have six inches of extra plywood hanging off each end, which is fine. With a cloth over it, it will look like a large rectangular space and a little less force is exerted on the center when the legs are closer together than the full 7 feet. To connect the top together, drill eight holes - two rows of four - on the sides that you want them to connect. Don't skimp try to use fewer bolts - one of the tricks of this design is that the bolts and brackets allow lighter pieces of wood to take the weight.
For the legs, use four 4 x 4 posts. On a regulation altar you will want the posts to be 43 1/2 inches for a total altar height of 44 inches. The altar that I built for the conference used 42 inch legs to shorten it a bit along with the reduced length, but the full 43 1/2 should work the same. Don't skimp and try to use 2 x 4 lumber for the legs - each of the 4 x 4 posts will be heavy, but they are strong enough that as long as they are secured properly you don't need wooden cross-braces on the sides or back. This is also vitally important to reduce the weight of each piece. You have four somewhat heavy legs, but each can be carried on its own.
The legs go inside the four outer corners of the assembled top, within the 1 x 6 squares, like legs on a table. Use four bolts to secure each leg, two from each of 1 x 6 boards that make the corner. Again, don't skimp on this - the number of bolts is important to keep the legs from wobbling. When fully tightened, the altar should stand on the four individual legs and be easily stable enough to use for the ritual. We were able to stand up on the conference altar and jump without any issues.
Other requirements - use washers with the bolts on both sides, and use those flanged nuts that can be unscrewed by hand. That way the whole thing can be taken apart and assembled without much in the way of special tools. Sometimes you wind up needing a pliars if one or more of the nuts tightens during the ritual - which happens sometimes. The washers minimize this sort of slippage, but they don't eliminate it entirely.
And basically, that's it. One of the nice things about going to a store like a Home Depot is that they can cut the wood for you - with this design it doesn't need to be super-precise for exactly this reason. You can get the following supplies and you should be good to go:
- Two 3 x 3 (or 3 1/2 x 3) foot pieces of half-inch plywood.
- Eight pieces of 1 x 6 lumber 35 1/4 inches long. The actual "1" in a 1 x 6 is 3/4", so you want each side to be the full three feet with one other board butted against it at the corner.
- Box of 1 inch screws.
- Box of 1 5/8 inch screws.
- Eight 2 or 2 1/2 inch bolts for screwing the top together.
- Sixteen 6 inch bolts for the legs, four per leg.
- Eight L-brackets, for all four corners of each 1 x 6 square. These are sold in little kits that come with screws.
- 24 hand-tightenable nuts.
- 48 washers.
- Power drill/driver for drilling the holes and driving in screws. You can screw this together by hand, but it will take a lot longer to do that.
- Extra-long drill bit the same size as or (slightly) larger than the diameter of your bolts.
- Screwdriver bit for the drill.
If you have questions, feel free to leave them in the comments. I'll do my best to answer them.


No comments:
Post a Comment